In parts 1 to 4, we spent a lot of time on the network: taking stock, a complete overhaul, installing UniFi, and even a 5G backup for the day the fibre decides to act up. The network is clean, segmented, reliable. In short, the foundations are laid. All I’ve got left is a bit of cosmetic work in the rack with tidy cabling, some 3D prints, adding the UPS… I’ve already started on these but with the heatwave I’m putting that on hold, and I’d rather focus on the theory of the homelab than fire up a 3D printer at 210°C. I’ll get back to it later and, of course, I’ll document these finishing touches on the main rack in a dedicated article.
Now, we’re getting into the part I’ve been itching to do since the very beginning: the homelab itself. The servers, the virtualisation, the services. But before plugging anything in and launching the slightest install, I’m going to do something that might seem counter-intuitive when you’re keen to get your hands dirty: I’m going to think it all through first, on paper (well, on screen, but you get the idea).
Let me warn you straight away: this article is 0% practical and 100% reflection. No commands, no installation screenshots. That’s deliberate. I’m laying out the whole architecture here and justifying each choice, so that the following articles can focus on the concrete stuff without having to stop every two lines to explain why we’re doing it this way. If you want hands-on, see you in part 6. If you want to understand the reasoning behind an infra built to last, stick around.
Documenting your decisions: the ADR approach#
At work, I picked up a habit I find excellent and absolutely wanted to apply to this project: documenting architecture decisions as ADRs (Architecture Decision Records). The principle is dead simple: for each somewhat structuring technical choice, you write a short paragraph that answers four questions. What’s the context? What were the options? What’s the decision? And above all, why?
The point isn’t to look pretty. It’s that in six months, when I ask myself “wait, why did I choose that again?”, I’ll have the answer written in black and white, with the reasoning of the time. And if I change my mind later, I don’t rewrite history: I mark the old decision as superseded and document the new one. It’s honest, it’s traceable, and frankly it forces you to think before you act.
This whole article is really the narrated version of my ADR document. I made a good twenty decisions before writing a single line of code, and I’m going to walk you through them by theme.
My decision grid#
Before diving into the choices, I need to set the frame. Because a “good” technical choice doesn’t exist in the absolute: it’s good for a given context. Mine comes down to three criteria, and the order matters:
- Learning value. With equivalent technical choices, I take the one that teaches me the most. This homelab is above all a playground for building up skills: Kubernetes, GitOps, networking, secrets management. If a technology helps me progress, it starts with an advantage.
- Availability. When a choice affects a service that has to stay up, robustness comes first. But be careful: here, high availability mostly serves to learn high availability. This is a test lab, not a critical foundation that production services depend on, at least not for now.
- Budget. I make do with the existing hardware first, and I only buy if what I have really isn’t enough.
You’ll see these three criteria come up again and again in what follows. Every time I’ve had to decide between two options, it’s one of them that tipped the balance.
What I want to use it for#
Let’s be clear about the use, it avoids over-sizing. This lab serves two purposes: testing infrastructures (playing with technologies, breaking things, starting over) and self-hosting services I currently use in the cloud, mainly to try them out. No critical “family” service at this stage. Nobody’s going to complain if I take the cluster down on a Sunday afternoon to test a failover.
The guiding principle: everything must redeploy from git#
If there’s one idea that structures everything else, it’s this one: everything must be able to rebuild automatically from my GitLab repos, identically, effortlessly.
Infrastructure as Code (IaC) isn’t an accessory I’ll add “when I have time”, it’s the starting principle. If tomorrow all three machines catch fire (which I’m not hoping for, but which I’ve covered anyway with a smoke detector dedicated to the lab), I need to be able to rebuild everything from the code. It’s this constraint that explains a good part of the decisions that follow.
The hardware I’m working with#
We’re not starting from nothing: I already had four machines sitting idle in the homelab. Rather than buying new, I’m working with them.
| Role | Machine | CPU | RAM | Disks |
|---|---|---|---|---|
| Cluster node ×3 | Dell OptiPlex 7050 Micro | Core i5 (2.5 GHz) | 24 GB | 256 GB SATA SSD + 512 GB NVMe |
| Backup | Dell OptiPlex 9020 Micro | Core i5 (3.2 GHz) | 8 GB | 512 GB SSD |
Three identical OptiPlex 7050s, handy for building a homogeneous cluster. And a slightly older, lighter 9020, perfect for a separate role.
On the network side, each OptiPlex has a single built-in 1 GbE port. Everything is hooked up to the 2.5G switch (not documented yet, but it’s a USW-Flex-2.5G-8-PoE), in the dedicated lab VLAN (192.168.3.0/24, gateway on .1), the one we prepared in the networking episodes. For remote provisioning, I’ve also got a JetKVM, a small KVM-over-IP box that lets me mount ISOs remotely and keep console access even when the machine stops responding. We’ll come back to it, it’s a key tool for the “everything in code” approach.
One point to keep in mind, because it’s going to come up constantly: the scarce resource here is RAM. With 24 GB per node, each software building block is also judged by what it costs in memory. A component that eats 4 GB of RAM “just for show” is something I can’t afford. This constraint eliminated several candidates, as you’ll see.
Two upgrade levers are identified in case things get tight: bumping the 7050s to 32 GB (I believe that’s the maximum the CPU supports) and the 9020 to 16 GB (the most worthwhile purchase), and adding a 2.5 GbE M.2 network card to finally make use of the switch. But I only pull those levers if it’s really necessary. Budget first.
The foundation: Proxmox in a 3-node cluster#
First big decision, the most foundational: the hypervisor. It’s the layer everything else will run on.
The choice landed on Proxmox VE 9.2 without much hesitation. I looked at the alternatives (XCP-ng, ESXi), but ESXi is out of the equation since the Broadcom acquisition and the whole licensing mess, and Proxmox remains the homelab standard: free, mature, Debian-based, with clustering and replication built in, and a very rich as-code ecosystem (Ansible, OpenTofu, Packer all support it). It ticks both the learning box and the budget box (it’s free). Easy.
Next, how to lay out the four machines? Here’s a classic trap: the temptation to put all four in a cluster. Except that a 4-node cluster is an even number, and an even number of voters carries the risk of split-brain (two halves of 2 nodes that can’t settle it between them). So I went for a 3-node cluster (the three identical 7050s) with the 9020 kept out of the cluster, dedicated to backups with Proxmox Backup Server.
Two good reasons for this. First, an odd number of nodes gives a healthy quorum without having to rig up a QDevice. Second, it’s good practice to keep the backup target out of what it protects: if the cluster goes haywire, the backups are on an independent machine. The accepted consequence: I tolerate losing one node without flinching, but losing two nodes makes the cluster non-functional. For a lab, that’s perfectly acceptable.
High availability, yes, but with ZFS replication#
Cluster and high availability means storage. Two schools of thought clash here: Ceph (hyperconverged distributed storage, the Rolls-Royce of the genre) or asynchronous ZFS replication between nodes.
I’d have loved to do Ceph, honestly, for the learning. But Ceph is greedy: reckon on around 4 GB of RAM per OSD and a network of at least 10 GbE for it to breathe. My RAM is scarce and my network is 1 GbE. In short, it would be a bit complicated with this hardware. So I opted for ZFS replication between the three nodes: Proxmox periodically replicates the VM disks from one node to another, and in case of failure, the VM restarts on another node with the data from the last replication.
The trade-off is that it isn’t zero-loss: you lose whatever happened between two replications. For a lab, that’s more than enough. And I’m keeping Ceph in my back pocket as a learning topic for the day I have the network and RAM to host it properly.
Storage: ZFS where it earns its place#
Each 7050 has two disks: a 256 GB SATA SSD and a 512 GB NVMe. Rather than mixing everything together, I split the roles.
- The Proxmox OS goes on the SATA SSD, on plain old ext4/LVM. The remaining free space serves as the
localdatastore for ISOs, templates and other dumps. - The VMs and containers go on the NVMe, in a ZFS pool (with the same pool name on all three nodes, essential for replication, and the ZFS ARC capped at 4-6 GB so it doesn’t devour RAM).
Why this split? The NVMe is bigger and faster, so it hosts what grows and what needs I/O. And I only use ZFS where it genuinely brings something: checksums, snapshots, replication. Putting ZFS on the system disk would be pointless: the host is fully reproducible from the code, so if something goes wrong I reinstall, I don’t restore. Might as well keep the system simple. The downside is that there’s no redundancy inside a node (a single disk per pool), but that’s offset by the replication between nodes and by the backups.
An exception for the backup server#
A little subtlety that goes against my initial instinct (“ZFS everywhere!”). The backup node, the 9020, only has 8 GB of RAM. And Proxmox Backup Server already does its own integrity checking of the data it stores (jobs that verify the chunks regularly). ZFS checksums would therefore be redundant, and the ZFS ARC would waste RAM that’s already accounted for. Result: the PBS datastore will be on ext4, plain and simple. Integrity is ensured by PBS itself, and I keep things simple on a constrained machine. Just goes to show, “the best technology” sometimes gives way to “the technology suited to the context”.
The heart of the project: everything in code#
We’re getting to the part closest to my heart, the one that gives the whole approach its meaning. Remember the guiding principle: everything must rebuild from git. Here’s the toolchain that makes it possible, layer by layer.
Installing the servers themselves. Even the bare-metal has to be reproducible. Proxmox 9 offers an automated installation via an answer file (a TOML that describes everything: disks, network, passwords…). This file lives in git. To trigger the install remotely without a USB stick, I mount the ISO through the JetKVM. It’s the only step I own up to as “semi-manual”: you have to trigger the installation node by node. But what gets installed is entirely described by the code.
Configuring the hosts and creating the cluster. Once Proxmox is installed, you have to configure the repos, the network, ZFS, and above all create the cluster and the replication jobs. That’s Ansible’s job (with the lae.proxmox role). Why Ansible here and not the tool from the next layer? Because creating the cluster is precisely the link that declarative provisioning tools can’t handle. Ansible will also come in handy for configuring the inside of the VMs.
Provisioning the VMs and containers. Once the cluster is up, I create my VMs and LXCs with OpenTofu (the open-source fork of Terraform) and the bpg/proxmox provider. The choice of OpenTofu over Terraform isn’t ideological: OpenTofu offers client-side state encryption, natively, which the Terraform CLI doesn’t have. And since the state contains secrets in plaintext, that’s decisive (we’ll come back to it in a moment). Add to that an open licence, governance under the Linux Foundation consistent with my other choices, and a bpg provider that explicitly supports OpenTofu and covers VMs, LXC, SDN and HA. The old Telmate provider was ruled out, it’s no longer maintained enough.
The base images. For VM creation to be truly reproducible, you need versioned templates. That’s Packer’s role, building clean, replayable cloud-init images. For Talos (my future Kubernetes, we’re getting there), the image comes from the Talos Image Factory.
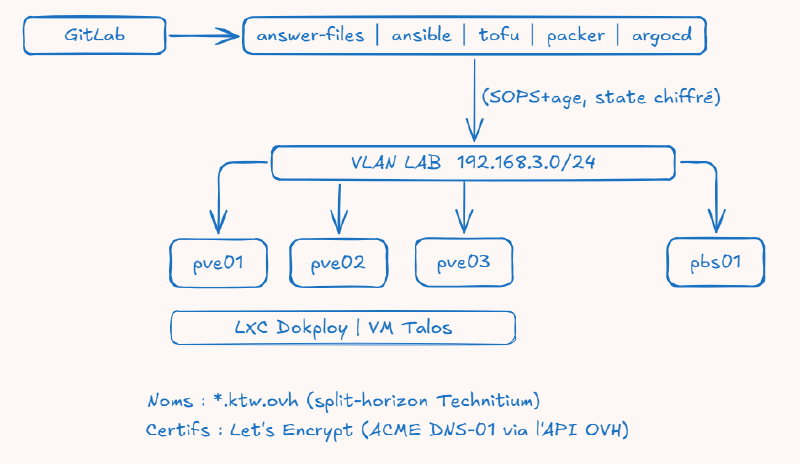
The repo and CI/CD. All of this lives in a GitLab monorepo, with one folder per layer (answer-files/, ansible/, tofu/, packer/, argocd/). GitLab CI/CD runs the plan and the lint on each merge request, and the apply on merge. Important detail: GitLab.com’s shared runners can’t reach my local network, so I need a self-hosted runner, in a dedicated LXC, to run the applys. And pre-commit hooks (gitleaks, tflint, ansible-lint) stand guard to stop a blunder or a plaintext secret from slipping into a commit.
Yes, there’s a little chicken-and-egg problem: the runner that runs the automation is itself deployed by the automation. So the very first apply is done by hand from my computer, then the LXC runner takes over for everything else.
The OpenTofu state. The state file (the state, which describes what actually exists) is stored in the HTTP backend managed by GitLab, and on top I encrypt the state client-side with the passphrase managed by SOPS. The state never lives in git, and even if the backend leaked, it would stay unreadable. Defence in depth. And the API token I use to drive Proxmox is scoped and revocable, definitely not the root password.
Secrets: a single mechanism everywhere#
A private repo is not a vault: git history is eternal, a secret committed by mistake stays there forever. So I needed proper secrets management. I compared Ansible Vault (too limited to Ansible), Vault/OpenBao (heavy, and a single point of failure if it runs in the very cluster it’s supposed to secure), an external vault like Bitwarden… and I chose SOPS + age.
The principle: secrets are encrypted inside the repo, but SOPS only encrypts the values, not the structure. So the diffs stay readable (you see which key changed, not its value). And above all, a single mechanism serves everyone: Ansible (via community.sops) and OpenTofu (via the carlpett/sops provider) read the same secrets. It’s pure GitOps, with no external dependency and no single point of failure. Bonus: it’s a tool I don’t know yet, so the learning box is ticked.
The root of trust is the age private key. It lives outside git, on my computer and as a protected variable in the CI/CD, with a backup copy in Bitwarden (my password manager) just in case. It’s the only secret I have to protect manually, everything else flows from it.
And I extend this mechanism all the way into Kubernetes. Rather than reintroducing an external vault I’d ruled out, I’ll use KSOPS: ArgoCD decrypts the SOPS-age secrets at deployment time. One and the same logic from bare-metal to pods, secrets encrypted in git, and a rotation that boils down to a commit. Consistent with “everything rebuildable from git” from end to end.
Network, names and certificates#
The physical network we’ve already covered in the previous episodes. Here, it’s mainly about the addressing plan and two or three logical choices.
The whole lab lives in the 192.168.3.0/24 VLAN, with a tidy addressing plan:
| Host | IP |
|---|---|
| pve01 / pve02 / pve03 | .11 / .12 / .13 |
| pbs01 | .20 |
| JetKVM | .30 |
| Infra services (DNS…) | .40-.49 |
| Static VM/LXC | .50-.99 |
| DHCP range | .100-.199 |
Regarding Corosync (the service that handles communication between cluster nodes), I’m leaving it on the shared 1 GbE link for now. On three nodes and a lightly loaded lab, that’s acceptable. If I notice Corosync retransmissions later, the upgrade is clear: add a dedicated 2.5 GbE card to isolate the cluster traffic. But no premature buying.
A real domain and a code-driven DNS#
A choice I find important: dropping .lan in favour of a real domain, ktw.ovh, dedicated to the lab. Why? Because .lan makes it impossible to obtain valid public certificates, and I don’t want to spend my time clicking “accept the insecure certificate”. With a real domain, I get a consistent namespace (pve01.ktw.ovh, argocd.ktw.ovh…) and valid certificates even internally.
For internal resolution, I’ll use Technitium in split-horizon (it answers differently depending on whether you query from inside or outside). I chose it because it exposes a complete API (so code-driven, naturally), because it handles split-horizon natively, and because it runs in a small, lightweight LXC. True to the principle: anything that can be described in code should be.
Valid certificates, without exposing anything#
The certificates, precisely: Let’s Encrypt via the ACME DNS-01 challenge on the OVH API of ktw.ovh. The trick with DNS-01 is that it proves I own the domain by creating a temporary DNS record, without having to expose anything on the Internet. Since .ovh is managed by OVH, the DNS API is natively supported by ACME clients (Traefik, cert-manager…). The OVH token is scoped to the DNS zone alone and tucked away in SOPS. Result: a fully automated certificate chain, valid certificates everywhere internally, and zero exposed services. The public ktw.ovh zone serves only for this, it has no public A records.
Update: the ktw.ovh domain is indeed registered with OVH, but its DNS zone is served by Cloudflare. So the DNS-01 challenge ultimately goes through Cloudflare, which cert-manager supports natively. All the details in part 13.
The workloads: two tiers, Docker and Kubernetes#
Here’s a decision that might come as a surprise: I don’t choose between Docker and Kubernetes, I do both, at two tiers.
I’m already comfortable with Docker and Compose, and I want to seriously progress on Kubernetes, which I only know in broad strokes. Rather than forcing myself to do everything in k8s (and struggling to deploy the smallest service), I’m setting up:
- A Docker tier with Dokploy (in an LXC), which pulls from git and lets me deploy a service in two minutes. That’s my comfort tier.
- A Kubernetes tier with Talos, to learn for real.
The benefit of this pairing, beyond comfort, is that it gives me a great observability playground: being able to compare the two paradigms side by side. And there’s an availability logic: my comfort doesn’t depend on the health of my learning k8s cluster, which I’m bound to break from time to time. The only constraint is RAM (that one again): I size things modestly and avoid pushing both tiers to the max at the same time.
The Kubernetes stack#
For the k8s cluster, I deliberately chose industry-standard building blocks. The idea: that every hour spent on it has value beyond my lab, while staying approachable for someone who isn’t a k8s expert.
- Talos as the OS: three VMs combining control-plane and worker (one per physical node), with etcd across three for high availability. Talos is a minimalist, immutable Linux OS, fully API-driven. Zero SSH, everything in code: exactly in the spirit of the project.
- Cilium as the CNI (the pod networking layer), replacing kube-proxy and bringing Hubble’s observability.
- Longhorn for replicated persistent storage. It’s an admitted beginner’s choice, easy to get to grips with; I’m keeping democratic-csi towards ZFS for later, when I want to go further.
- Traefik as ingress, with built-in ACME management (which fits right in with my certificate choice above).
- ArgoCD for GitOps, with the app-of-apps pattern. Everything running in the cluster is described in git and deployed by ArgoCD. We close the loop on “everything rebuildable”.
Observability: a single pane, three worlds#
It’s a bit of an occupational hazard, but I can’t picture an infra without knowing what’s going on inside it.
The goal: a single Grafana that aggregates three different worlds. Kubernetes metrics (via kube-prometheus-stack), Proxmox metrics (via prometheus-pve-exporter) and Docker-tier metrics (via cAdvisor and node_exporter). All collected by Grafana Alloy (metrics and logs) and sent to Loki for the logs. Being able to compare the hypervisor, Docker and Kubernetes on the same screen is extremely instructive.
And true to the “observe from the outside” principle, I’ll probably put an Uptime Kuma somewhere else, independent of the cluster it monitors. Same logic as the out-of-cluster backup server: the watchman mustn’t go down at the same time as what he’s watching.
Resilience and security#
Two last topics, quickly but essential.
Backups, with the good old 3-2-1 rule tackled in stages. PBS backs up the VMs and LXCs. Longhorn backs up its volumes to an S3 target. For off-siting (the “1” of 3-2-1), I’m starting with a simple encrypted USB drive, then I’ll move towards Backblaze B2 or equivalent when it makes sense. Budget first, robustness second. And a distinction I find important: git redeploys the platform, backups restore the data. Two clearly distinct recovery paths.
The firewall. I’m starting with the native Proxmox firewall, more than enough as long as nothing is exposed. I might evaluate OPNsense once the cluster is in place.
The target architecture, in one diagram#
If I had to sum all this up in one image, here’s what it would look like:
The roadmap#
All this thinking translates into an 8-phase plan, which I’ll follow (roughly) in order for the upcoming articles:
| # | Phase | Tools |
|---|---|---|
| 0 | Workstation + repo skeleton | brew, age, SOPS, pre-commit |
| 1 | Physical installation of the 4 nodes | answer files + JetKVM |
| 2 | Host configuration + cluster creation | Ansible (lae.proxmox) |
| 3 | Day-2 foundations (state, CI, runner) | OpenTofu, GitLab CI |
| 4 | Golden images | Packer, Talos Image Factory |
| 5 | Docker tier | OpenTofu → Dokploy |
| 6 | Talos cluster | OpenTofu (bpg + talos) |
| 7 | ArgoCD + observability | ArgoCD (app-of-apps) |
| 8 | Full bootstrap + recovery test | Taskfile |
The tipping point is the end of phase 2: from the moment the cluster exists, everything else follows on in replayable code. Phases 0 and 1 are done once, a bit by hand. Phases 3 to 8 are fully automated.
The still-open questions#
I’m not going to pretend I’ve settled everything. There are still points up in the air, and I’d rather own up to it:
- Remote access and exposure. Tailscale seems the right candidate for remote access, but exposing certain services on the Internet isn’t decided yet. To be settled before publishing anything to the outside world.
- Kubernetes storage. Longhorn to start, democratic-csi towards ZFS when I want to move up a level.
- Off-siting the backups. The switch from the USB drive to Backblaze B2, at what point?
- The Corosync network. Stay on shared 1 GbE, or isolate a dedicated 2.5 GbE link?
- RAM. Bump the nodes to 32 GB if the workloads call for it.
Honestly, I think a project that lists its open questions inspires more confidence than one claiming to have an answer to everything. A decision marked “to be settled later” is still an honest decision.
And now?#
There we go, the theoretical foundations are laid. It might seem like a lot of thinking before plugging in a single cable, but that’s exactly the point: the next articles will be able to focus on practice, without me having to stop every three paragraphs to justify a choice. The why is right here, in this article.
In part 6, we finally get our hands dirty: preparing the workstation, the repo skeleton, and the first steps of automation. We’re going to start turning this fine plan into code that actually runs.
See you soon!